



How to Choose an LED Aluminum Profile for Under-Cabinet Lighting
Choose an under-cabinet LED profile by strip width, mounting type and cover. Real dimensions from 6 to 21 mm inner width, with a spec table.
Introduction — Think System, Not Just the Channel
An under-cabinet LED profile is not merely an extruded aluminum channel. It is a lighting system, and four elements decide whether it still looks clean three years later. Those elements are the alloy and its thermal mass, the diffuser material, the mounting method and the driver.
This guide follows the order a specifier works in. Measure the strip first. Choose the section second. Choose the cover third. Size the power last.
The steps below are written around kitchen wall cabinets, the most common case. The same logic applies to wardrobes, wine cabinets, bookcases, display niches and credenzas.
1. Material Selection: Aluminum Alloys and Optical Covers
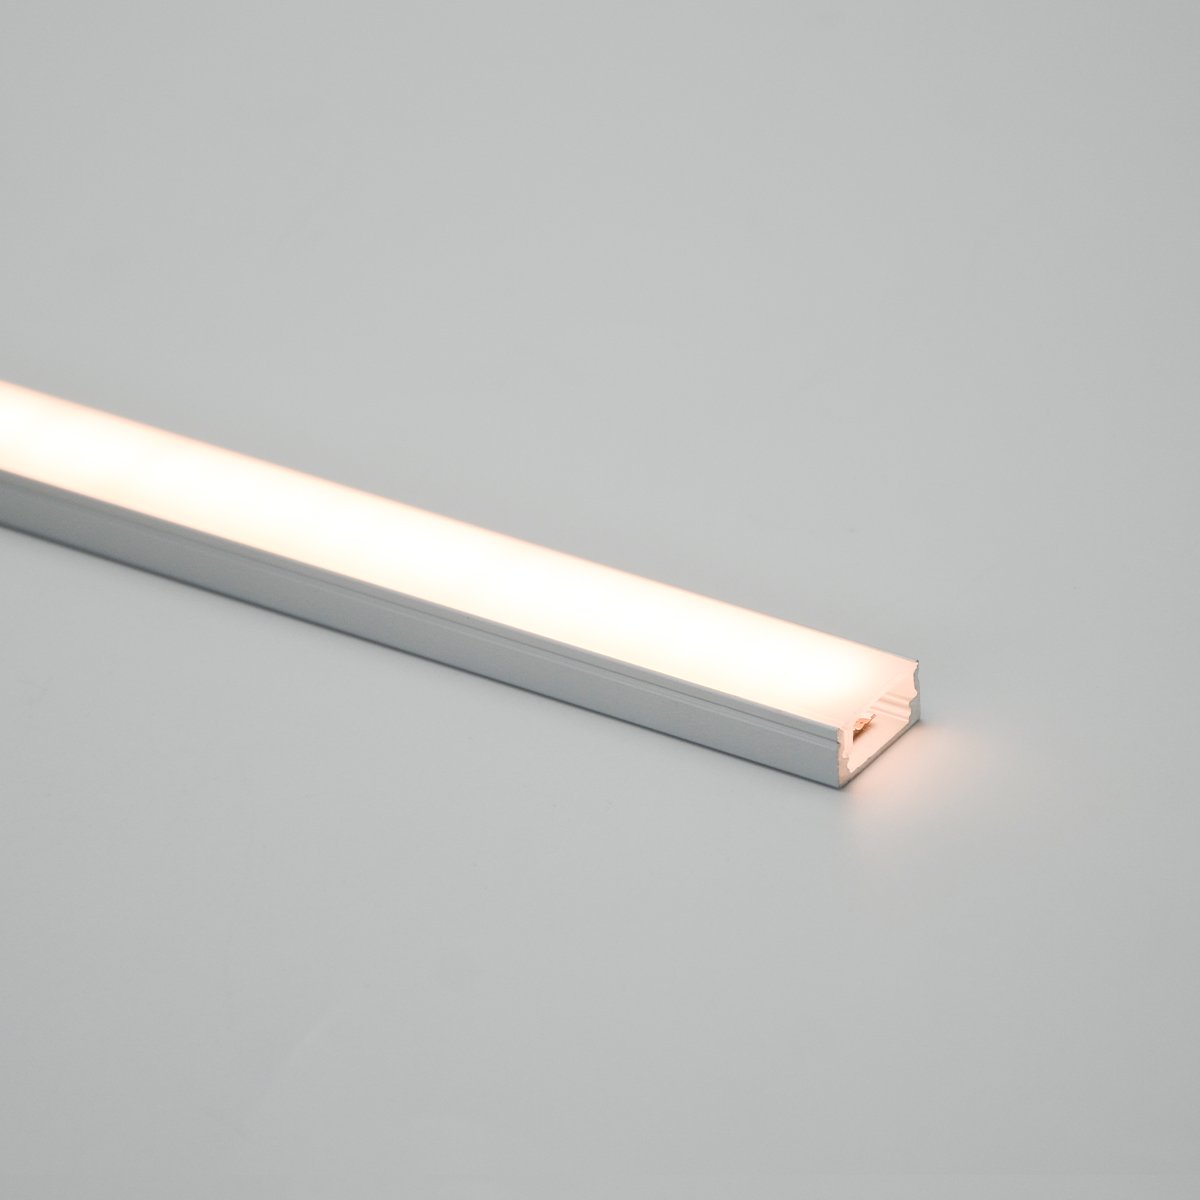
Extruded 6063-T5 aluminum is the benchmark for cabinet extrusions. In a kitchen it faces steam, cooking oil and constant humidity swings. Anodized aluminum resists corrosion, pitting and warping under all three.
Finish matters as much as alloy. A mirror-polished channel under a wall cabinet reflects the countertop and reads as glare, not light. Choose matte anodized or powder-coated. Then match the color to the cabinet interior, not to the floor. Black anodized disappears into a dark carcass. Natural anodized sits well with light oak and birch.
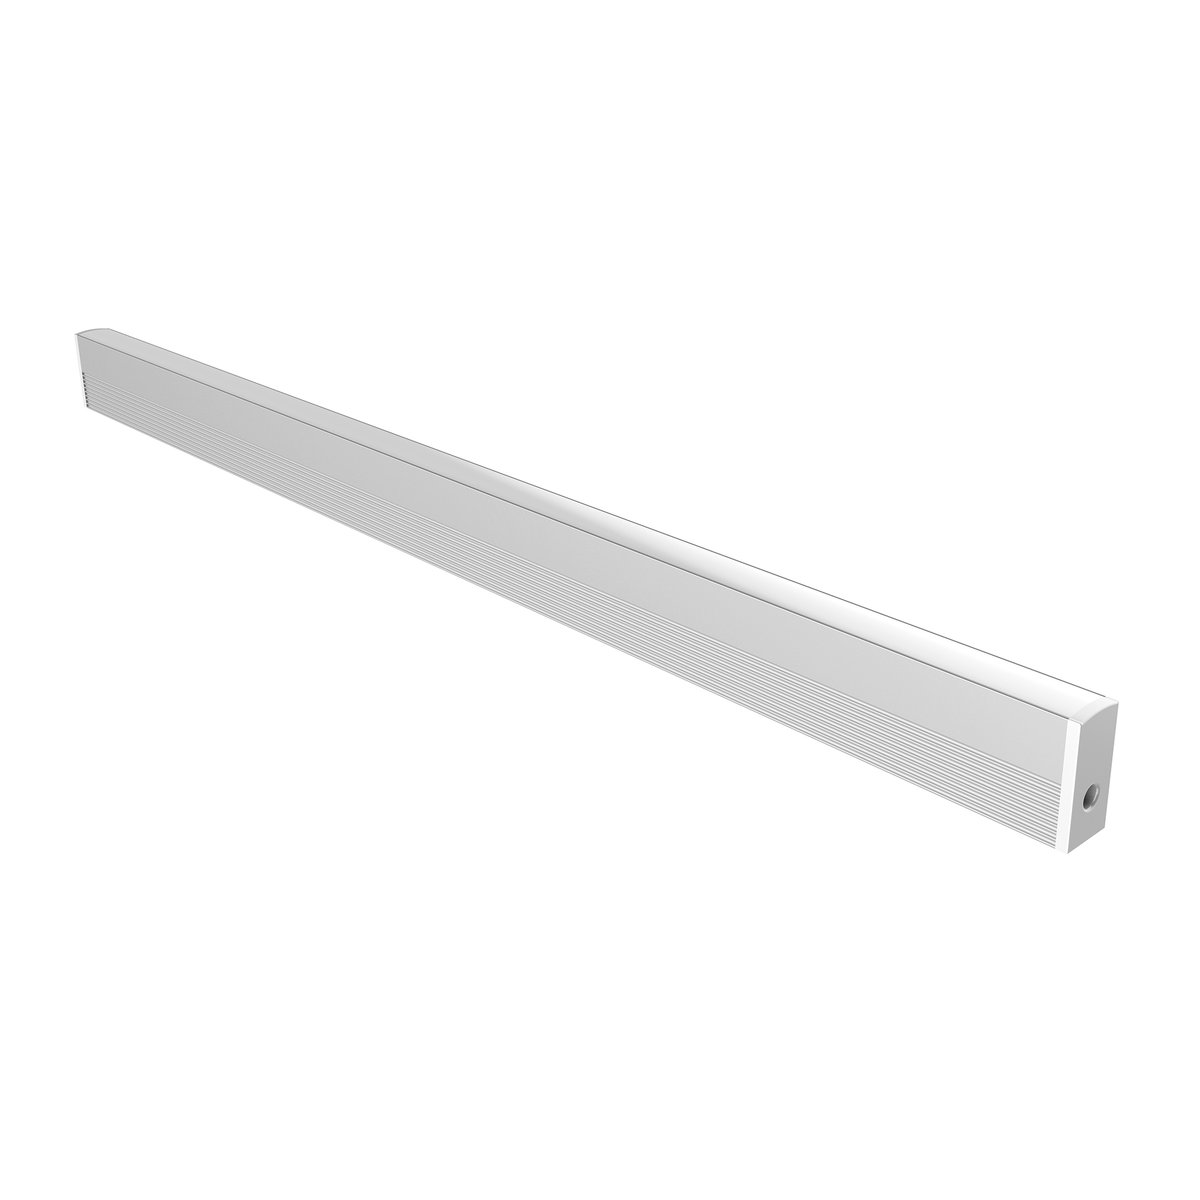
The cover controls both light softness and long-term durability. It is also where cheap profiles fail first.
Polycarbonate (PC): impact-resistant, fire-retardant, and stable at the temperatures found under a working wall cabinet. It survives on-site cutting without cracking and resists yellowing under continuous heat.
PMMA (optical-grade acrylic): the highest transmission and the best clarity of the three. A good choice for display niches. Standard low-cost acrylic must stay out of kitchens, though. Cooking heat and grease vapor cloud it, craze it and turn it yellow well before its rated life.
Flexible silicone: for a curved breakfast bar, a radiused island or a rounded display shelf, rigid aluminum cannot follow the geometry. A silicone sleeve bends around the radius with no corner joint and no shadow at the bend.
| Cover | Clarity | Impact resistance | Kitchen durability | Best use |
|---|---|---|---|---|
| PC (polycarbonate) | Good | High — survives site cutting | Resists yellowing; fire-retardant | Working wall cabinets, high-impact areas |
| PMMA (optical grade) | Highest clarity and transmission | Moderate | Good | Display niches, wine cabinets |
| Standard low-cost acrylic | High, but degrades fast | Low — brittle | Poor: clouds and yellows under heat | Avoid in kitchens |
| Flexible silicone | Seamless diffuse line | Flexible | Good | Curved islands, radiused shelves |
2. Thermal Management: Wall Thickness and the Heat Path
Wall thickness is the lifetime specification nobody prints on the box. A high-density strip concentrates heat at the PCB. That heat has one place to go: into the extrusion, then out through its surface into the cabinet void.
A thin, light-gauge channel has neither the mass to absorb the heat nor the surface to shed it. The same strip that performs well in a heavy section will fade and color-shift far earlier in a thin one.
Match the driver to the run, not to the shelf. A regulated constant-voltage or constant-current driver holds current steady along the whole run. Short runs are fine at 12 V and need no more. Past roughly two meters, specify 24 V, which keeps voltage drop from leaving the far end dimmer than the near end. Buying the cheapest driver that covers the wattage is the second most common cause of a dull last meter.
3. Light Quality for Task Areas
The profile protects the light; the strip defines it. The three parameters below are properties of the strip you put in the channel, not specifications of the aluminum profile. The profile only decides how evenly that light reaches the counter.
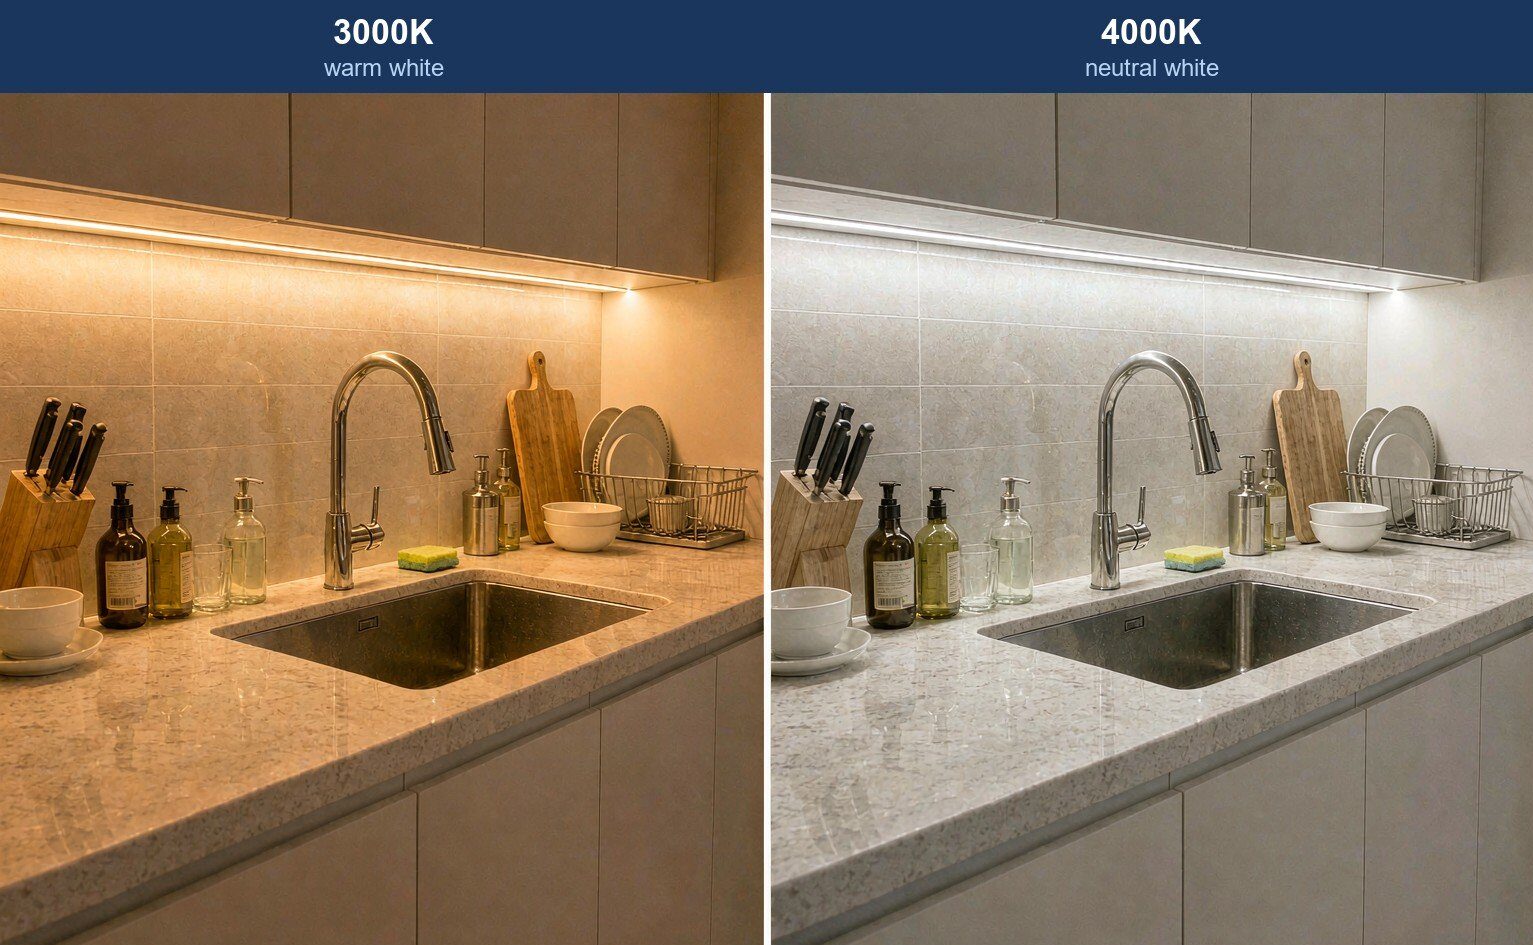
Color temperature (CCT): 4000K neutral white suits food preparation. It renders ingredients honestly and stays comfortable through a long session at the counter. 3000K warm white suits wine cabinets, credenzas and bedroom wardrobes, where ambience matters more than task clarity.
Color rendering (CRI): specify Ra ≥ 90 for any surface where food or fabric is judged. Below Ra 80, fresh produce looks gray and timber and stone lose their warmth. This is the most common complaint after a retrofit.
Output and evenness: brightness is set by the strip and the driver, not by the profile. Agree the target with your strip supplier and check a photometric report before you commit. What the profile must guarantee is even delivery: no hot band at the feed end, no dark tail at the far end.
4. Step 1 — Measure the Strip Before You Choose the Profile
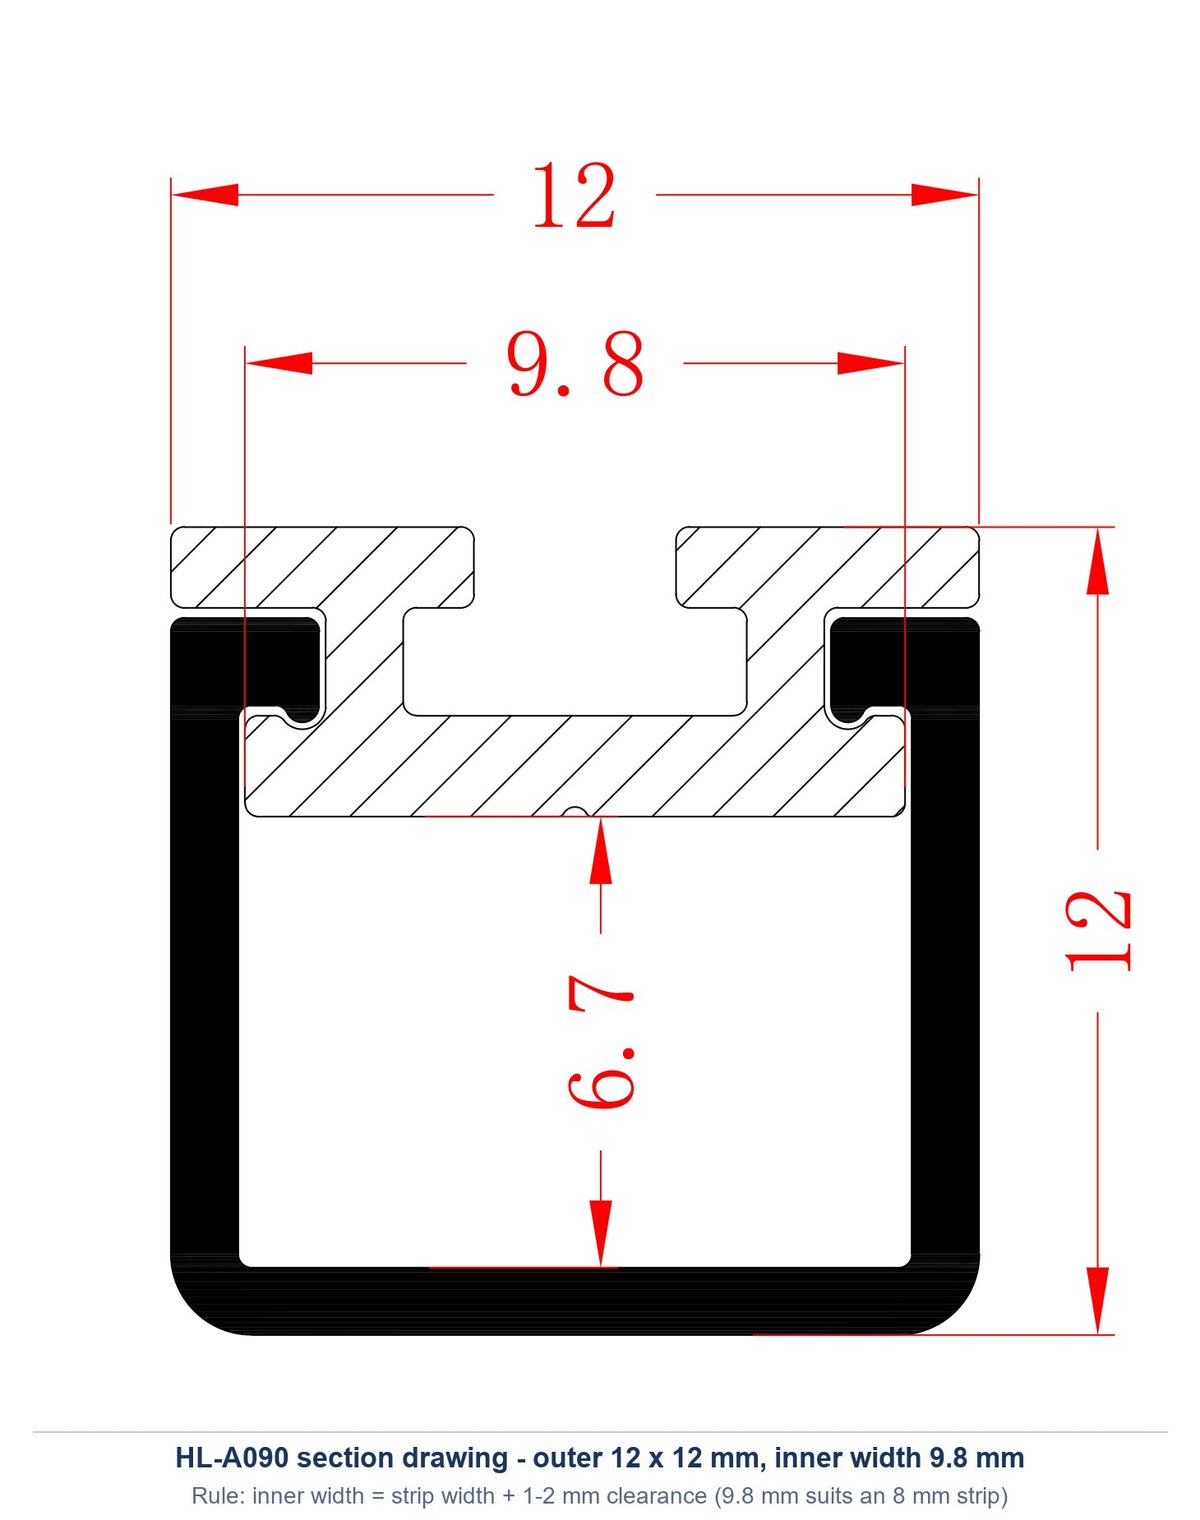
The most common mistake on under-cabinet jobs is buying a profile narrower than the strip that goes inside it. Standard tape measures 8, 10 or 12 mm wide. High-output or IP-rated strips reach 14–15 mm across the silicone sleeve, and solder joints add 1–2 mm at every feed point.
The rule is simple: inner width equals strip width plus at least 1 mm clearance. In practice, most kitchens run a 10–12 mm channel for an 8 mm strip. A strip forced into an extrusion with zero clearance will lift at the edges, break its adhesive backing and transfer heat poorly to the aluminum.
5. Step 2 — Pick the Mounting Type for Your Cabinet Stage
Where the profile sits decides whether you want it recessed, surface-mounted or tucked into a 45° corner.
Recessed (flush into a routed slot): the cleanest visual result. The diffuser face sits flush with the bottom panel. It requires a routed groove, typically 12–15 mm wide and 8–15 mm deep, cut before assembly or on site with a plunge router. Best where the underside of the cabinet stays visible from seated eye level.
Surface-mounted: screwed or clipped to the flat underside of the carcass. Quickest to install, no routing required. It sits 6–15 mm proud of the cabinet bottom and usually needs a light pelmet or face frame to conceal it.
45° corner profile: tucked into the rear corner where the cabinet bottom meets the backsplash, or into the front lip facing inward. It angles light across the countertop instead of down onto the floor or into standing sightlines.
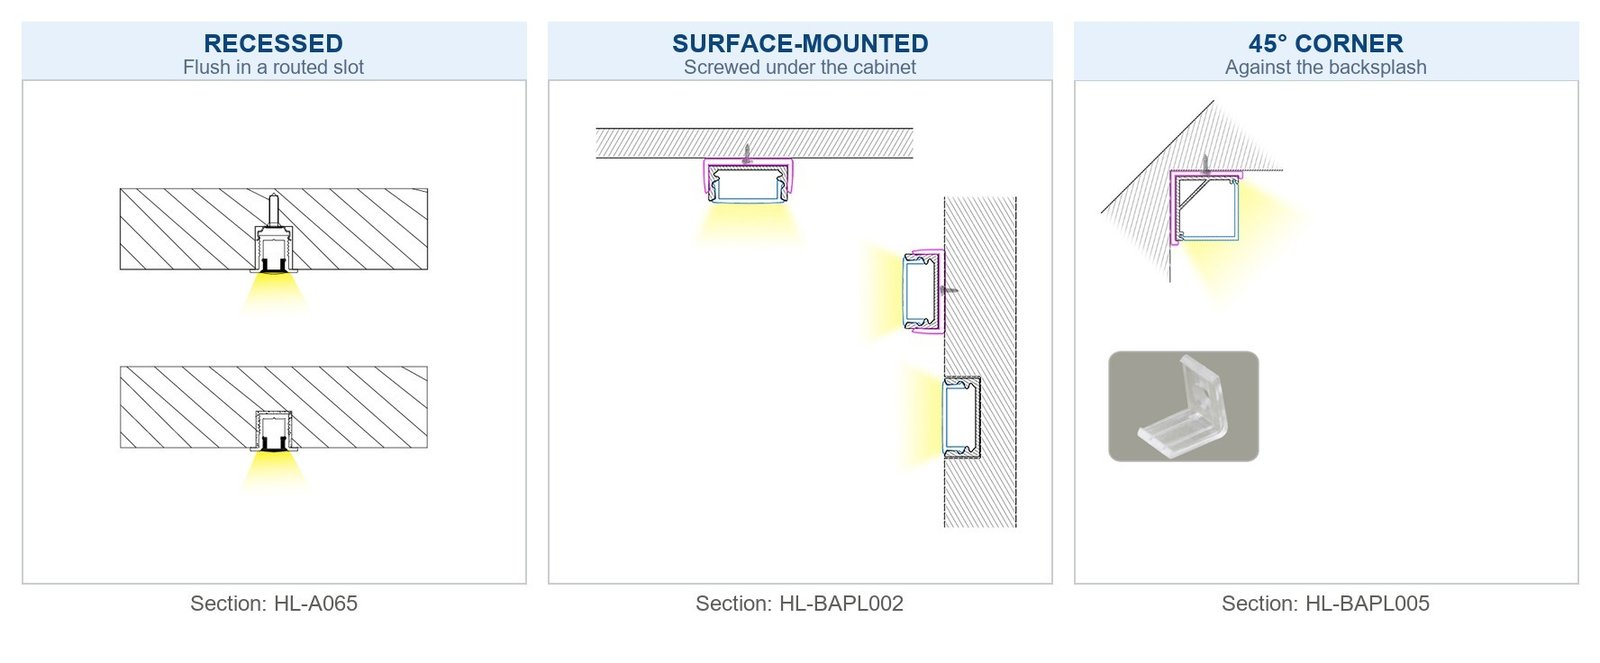
| Mounting | Cabinet work | Visual result | Best for | Watch out |
|---|---|---|---|---|
| Recessed | Route a groove, 12–15 mm wide and 8–15 mm deep, before assembly | Flush | New custom millwork, visible underside | Cannot be added after the cabinet is built |
| Surface-mounted | None | Slim visible line, 6–15 mm proud | Retrofits, finished millwork | Needs a pelmet or face frame |
| 45° corner | None | Light angled across the counter | Backsplash corner, front lip | Throws light sideways, not downward |
6. Step 3 — Choose the Cover: Clear, Frosted or Opal
Under-cabinet lighting shines straight onto the countertop. On polished stone, granite or glazed tile, individual diodes reflect back as harsh pinpoint dots.
Opal or milky diffuser: gives up the most light of the three. Paired with high-density tape it produces a smooth line with no hot-spots. The default for polished countertops.
Frosted or semi-clear diffuser: the middle ground. Softer dots, more light than opal. Acceptable over matte laminate, butcher block or brushed stone, where a pinpoint reflection will not bounce back at the user.
Clear cover: highest transmission, no diffusion at all. Use it only where the profile stays out of sight and the surface below does not reflect.
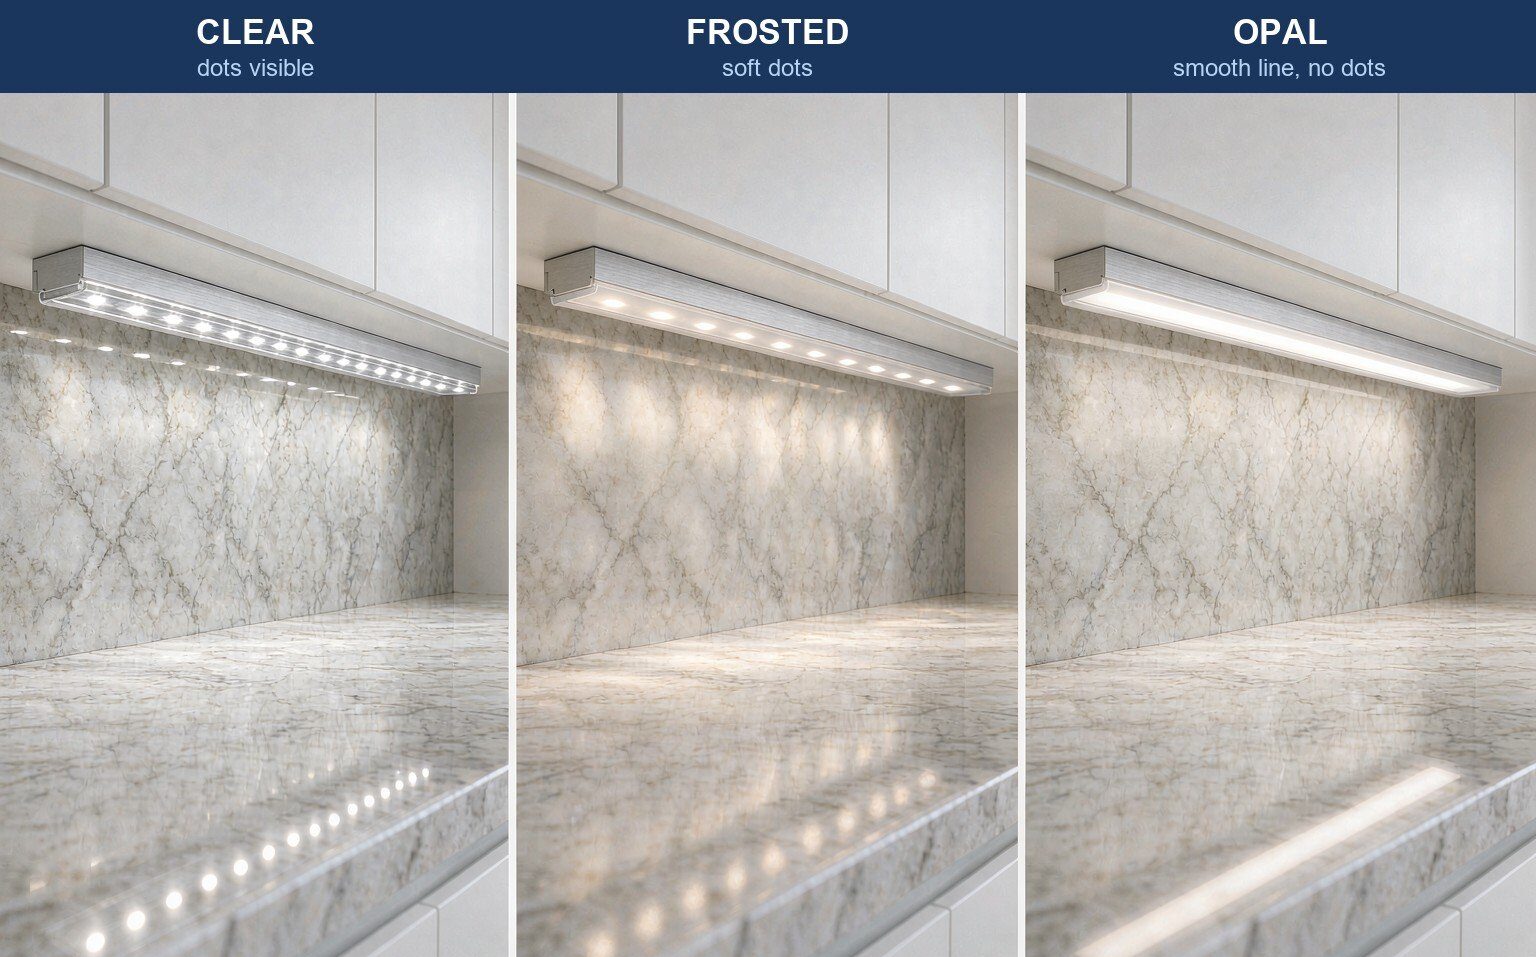
| Cover | Diffusion | Light output | Best for |
|---|---|---|---|
| Opal / milky | Complete | Lowest | Polished stone, granite, glazed tile |
| Frosted / semi-clear | Partial | Medium | Matte laminate, butcher block, brushed stone |
| Clear | None | Highest | Concealed runs over non-reflective surfaces |
7. Step 4 — Match Run Length and Control to the Application
The same profile behaves differently across a 250 mm drawer and a 3 m run of wall cabinets. Decide run length and switching before you order cut lengths.
Short runs (drawers, wine-rack cubbies, display niches): one short bar cut to each compartment beats daisy-chaining a single strip through the carcass. No cable snags on the drawer box, and one driver can serve several bars if the total load allows.
Long runs (a full wall of cabinets, a bookcase carcass): one continuous bar per run wherever the extrusion is available in that length. A mid-run joint always leaves a visible seam and a shadow line. Past roughly two meters, feed from both ends or move to 24 V.
Wardrobes and closets: pair the profile with a hand-wave sensor or a door switch. The light then comes on with the door instead of at a wall switch. Keep sensor and driver in the same accessible void. A sensor buried behind a fixed back panel becomes a maintenance problem later.
8. Power Supply Sizing, Ventilation and Electrical Safety
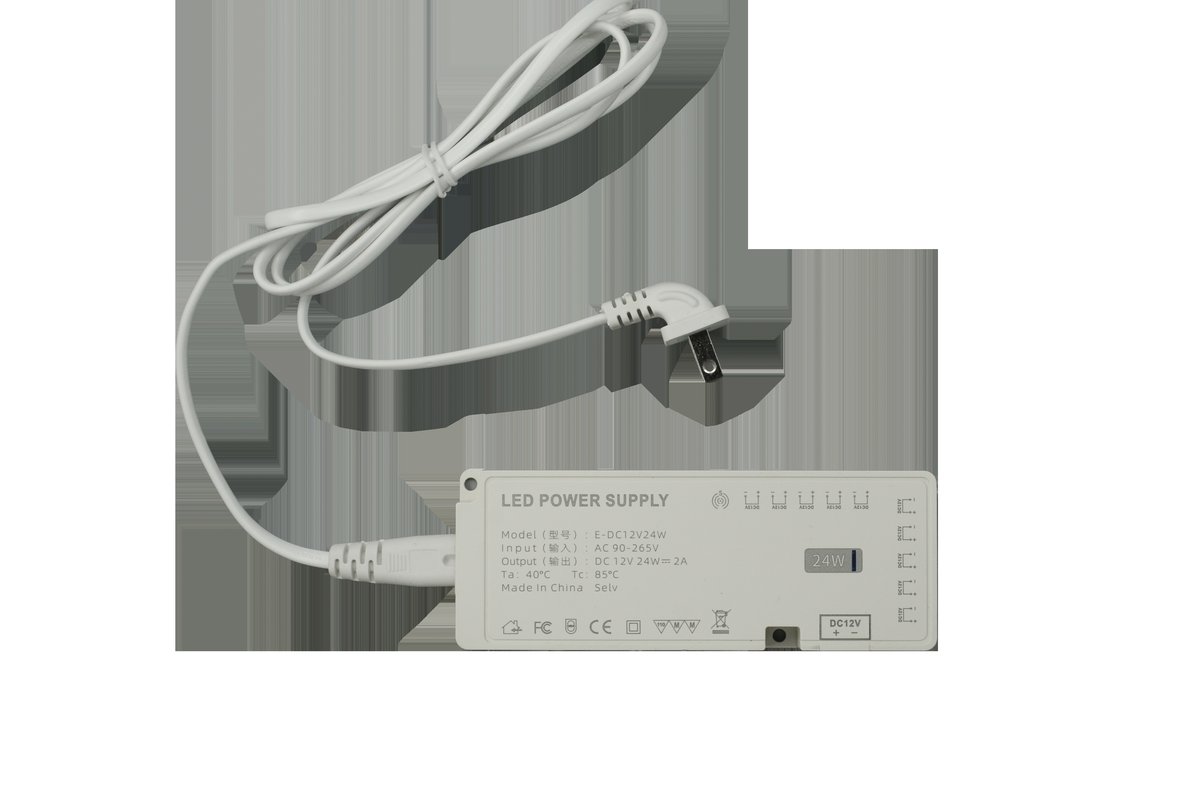
Driver buffer, 1.2–1.5×: power supplies should never run at 100% of rating. Add up the total load (watts per meter times meters) and specify a driver with 20–50% headroom. Running at or below 80% of rating cuts thermal fatigue and keeps the DC output stable as the cabinet warms.
Ventilated location: put the supply in an accessible, ventilated space such as a false top-cabinet void, a utility chase or a dedicated compartment. Never seal a supply inside a closed carcass. Trapped heat drives it into thermal shutdown, and replacing it means dismantling the cabinetry you have already installed.
Insulation and isolation: where a profile sits against metal shelving, stainless brackets or conductive hardware, confirm the end caps and strip insulation are intact. An uninsulated aluminum channel touching a metal carcass is a short-circuit path, not a heat sink.
Certification for the destination market: a driver approved only for the domestic market is not accepted on an export project. Your driver supplier should provide UL or ETL listing for North America, and CE or UKCA marking for the EU and UK. Ask for that document before the order ships. Retrofitting a certified driver into installed cabinetry costs far more than specifying it correctly.
9. Step 5 — Only Then Think About the IP Rating
The IP number belongs to the assembled fixture, not to the profile. A bare extrusion has no rating at all. What earns a rating is the whole stack: extrusion, cover, end caps, cable gland and sealant, built and tested together.
That has a practical consequence for cabinet work. If the run sits under a wall cabinet in a dry kitchen, IP20 is enough and the rating is not a selection criterion. If the cabinet faces a splash zone, a dishwasher vent or a window that stays open, the seals do the work. Choose end caps with a gasket, add a cable gland, and keep the joint out of the water path.
Do not accept an IP claim on a section drawing. Ask what the rating covers, and whether it was tested on an assembly or inferred from the components.
10. A Quick Decision Path
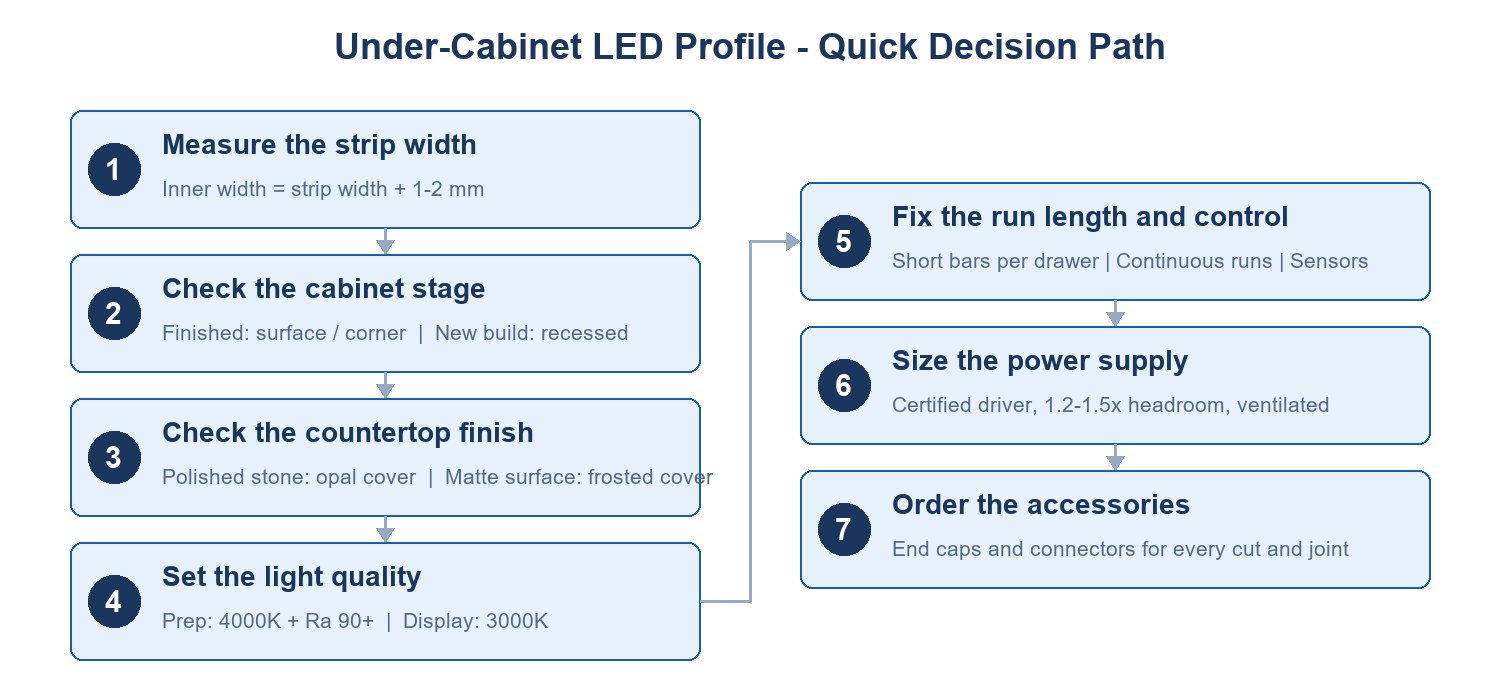
- Measure strip width, then choose an inner channel width of strip width plus 1–2 mm.
- Check the cabinet stage. Finished millwork takes surface or 45° corner. New custom millwork takes recessed flush.
- Check the countertop. Polished quartz or granite wants a deep profile and an opal PC cover. Matte surfaces take a frosted cover.
- Set the light quality: 4000K neutral white and Ra ≥ 90 for food prep, 3000K for wardrobes and display.
- Fix run length and control: one short bar per compartment, one continuous bar per long run, sensor switching in wardrobes.
- Size the power: a certified driver with 1.2–1.5× headroom, in a ventilated and serviceable void.
- Order the accessories: end caps and brackets for every cut run and every joint.
Frequently Asked Questions
Do I really need an aluminum profile for under-cabinet LED strip?
Yes. Adhering bare strip to cabinet wood or laminate leads to rapid adhesive failure and premature diode degradation. Wood cannot dissipate heat, and as the PCB heats up the phosphors degrade and the color shifts within months. An extruded aluminum profile acts as the heat sink, and the cover shields the diodes from steam, grease and impact.
What is the best profile for under-cabinet lighting?
For cabinetry still in manufacture, a shallow-flanged recessed profile with an opal PC diffuser gives the cleanest flush look. For retrofits, a 45° corner profile mounted against the backsplash throws light across the counter instead of into the user's eyes.
Can I cut the aluminum profile on site?
Yes. Anodized 6063-T5 cuts with a hand mitre saw or a drop saw fitted with a non-ferrous carbide blade, and the cut stays clean. Keep the diffuser snapped into the profile while cutting, so both lengths match and the plastic cover does not burr.
How do I stop seeing individual LED dots on shiny countertops?
Reflection spots appear when diode spacing shows through the cover. Use a high-density strip or continuous COB tape, not a standard low-density reel. Choose a profile deep enough to put distance between diodes and cover. Fit an opal or milky PC diffuser over polished stone.
What length should I order?
Profiles are supplied in any length up to 4 m. Measure the total continuous run and order the nearest standard length, allowing for end-cap thickness at each end. For drawers and cubbies, order short cut lengths instead of one long bar. For architectural projects, Helian supplies factory pre-cut lengths and pre-assembled fittings, which removes the site labor.
See also: Matching strip width to channel, and HL-A065.

We design and supply LED aluminum profiles and linear lighting — over 200 profiles with matched diffusers and fittings, serving customers in more than 100 countries since 2007.
Engineering Lead · Reviews every dimension, extrusion section and installation step for technical accuracy before publication.
Translation and copy review — terminology, clarity and consistency of the English text.
Related reading
Send the strip width, the run length and the destination — we will match the profile, the diffuser and the fittings, and quote within 1 business day.
Start your inquiry